Candy upcycling
How to not waste your Valentine’s Day stash
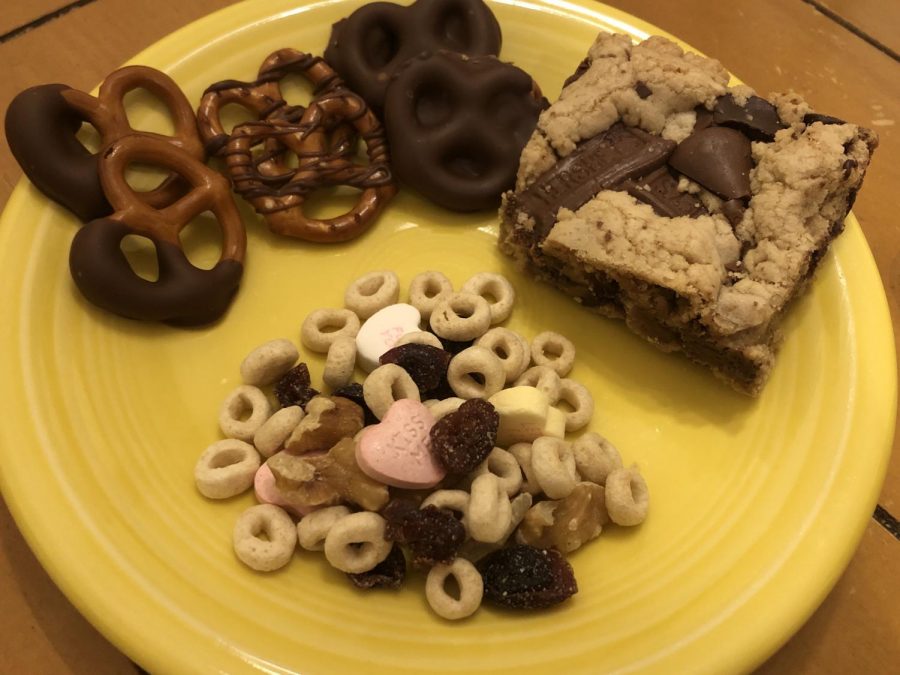
ZERO WASTE. By using old candy to create something new, the issues of still having Valentine’s Day candy several months later and wasting candy are things of the past. Next time you find yourself with an abundance of leftover candy, try these recipes on for size. From chocolate dipped pretzels, to candy-filled blondies, or a creative take on trail mix, everybody can find their perfect recipe. “What I like about these recipes is that one can eat the candy in innovative and exciting ways, instead of the same old, straight from the wrapper candy bar,” said Ellen McPherson, 10.
After about two weeks of nibbling on everything from candy hearts to chocolate roses, most find that it is about time to finish their beloved Valentine’s Day candy, or pitch it—unless they intend on slowly finishing heart-shaped boxes of chocolate until May.
For those of us who are not racing to finish our stashes, but do not want to waste some delicious candy, fear not, for there are a multitude of ways to upgrade your sweet treats.
#1: Trail Mix
Leftover candy hearts and M&M’s are perfect additions to any ordinary trail mix. Try the recipe below to use up the rest of your petite Valentine’s Day treats.
Start to finish: 5 minutes (5 minutes active)
Servings: 3-5
Ingredients:
- 1 cup Cheerios or similar cereal, or popcorn
- ¼ cup craisins or raisins
- ¼ cup leftover candy of choice
- Recommendations: candy hearts, M&M’s, skittles
- ¼ cup almonds or walnuts
Instructions:
- Place all ingredients into a bowl and mix until combined.
- Enjoy immediately or place in an air-tight container for storage.
#2: Chocolate Dippers
From nuts, to pretzels, to fresh fruit, just about anything can be adorned with melted chocolate following these simple steps.
Start to finish: 55 minutes (12 minutes active)
Servings: 2-5
Ingredients:
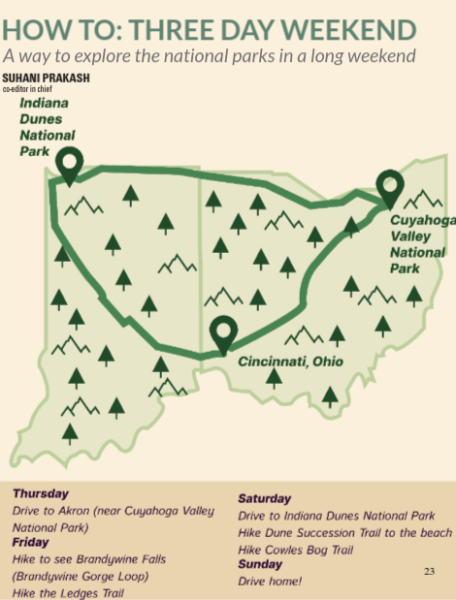
- 1-2 cups of dippers
- Recommendations: Nuts, pretzels, fruit, animal crackers, small cookies such as Oreos or Milanos
- 1-2 cups leftover chocolate of choice (white, milk, or dark), chopped
Instructions:
- Place chopped chocolate in a microwave-safe bowl. Microwave chocolate for 30 seconds, and then stir. Repeat this process two more times, or until chocolate begins to melt down.
- Once chocolate has mostly melted, microwave in 15 second intervals, stirring each time to prevent chocolate from over cooking. Once chocolate has reached a silky, smooth consistency to the point where it easily falls off of a spoon, it is ready for dipping.
- Choose one of the following options to cover your dippers.
- If you would like to drizzle chocolate on top of dipper, place dippers on a baking sheet lined with wax paper and drizzle chocolate over top of dippers with a spoon.
- If you would like to only partially cover your dippers, take each dipper and dip in melted chocolate until desired coverage is achieved. Place covered dippers on a baking sheet lined with wax paper to set.
- If you would like entire dipper to be covered in chocolate, place dipper in chocolate and toss to coat with a spoon. Place on a baking sheet lined with wax paper once covered to desired state.
- Place dippers in the fridge for about 40 minutes to set.
- Once chocolate has set and is firm to the touch, remove from baking trays and enjoy immediately, or store in an air-tight container for later consumption.
#3: Candy Blondies
Adapted from Somewhat Simple, this is an ideal recipe for your favorite leftover candies, adding a personalized flavor to these scrumptious blondies.
Start to finish: 45 minutes (20 minutes active)
Servings: 20
Ingredients:
- 12 tablespoons unsalted butter, melted and cooled
- 1 cup brown sugar
- ½ cup sugar
- 1 egg
- 1 egg yolk
- 2 teaspoons vanilla
- 2¼ cups flour
- 1 teaspoon baking soda
- ½ teaspoon salt
- 2 cups chopped candy of choice
Instructions:
- Preheat the oven to 325 °F. Line a 9×13 baking dish with parchment paper or spray with cooking spray.
- In a large bowl, whisk together the butter, brown sugar, and sugar until smooth.
- Add the egg, egg yolk, and vanilla, and whisk until smooth. Add the flour, baking soda, and salt, and mix with a spatula until just combined.
- Using a spatula, fold in 1½ cups of the chopped candy, being careful not to crush them.
- Spread the mixture in the prepared pan and press the remaining candy on top.
- Bake for 24-28 minutes, or until the edges are just golden brown.
- Allow blondies to cool before slicing into 20 bars. Enjoy!
Your donation will support the student journalists of Sycamore High School. Your contribution will allow us to purchase equipment and cover our annual website hosting costs.