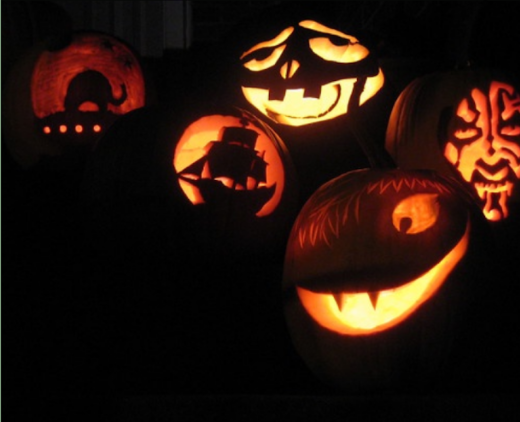
Tips and Tricks to Carving a Pumpkin
TRICK OR TREAT! With Halloween right around the corner, people are starting to break out some of the super-fun traditions of the season. Carving pumpkins is one of the popular ones, it’s super fun but not exactly easy. Click the link in the bio to find out some of my tips and tricks!
Halloween is right around the corner, and one of the most popular Halloween activities is carving pumpkins. Carving pumpkins is not easy, but here I will tell you some of my favorite tips and tricks to carving pumpkins.
Personally, I tend to carve my pumpkins more towards Halloween, that way they can look nice and fresh on Halloween night! Whenever I carve a pumpkin the first thing I do is open it up. When cutting it open I always cut it so that there is one triangle on the border, that way I know which way to put the top on. The next thing I do is scoop out all of the “guts”, something that is definitely not easy, but worth it in the end. This step allows you to have a smooth clean cut when carving the front of the pumpkin. When scooping out a pumpkin’s insides, the first thing I do is grab all the loose seeds with my hands, I then proceed to scrape the sides with a spoon, and then finally take the remains out. I recommend using your hands that way you are more precise and honestly, it’s a lot easier.
After your pumpkin is all cleaned out you can start on your design. Pinterest is a really good place to look for inspiration. On Pinterest, you can find step-by-step diagrams, printable papers, or just images of someone else’s pumpkin that you can try and copy. You also don’t have to be a pro to do many of these pumpkin designs, there is plenty of variety, it all just depends on what you are looking for. I’m not an artist myself and I use Pinterest every year for inspiration.
From there, I copy my designs down and draw them on my pumpkin with a Sharpie. I have found that Sharpie is easy to see and permanent enough that it won’t rub off with the moisture of the pumpkin.
After that, you are ready to start carving. The best tools to use when carving pumpkins is a small knife-I would recommend the kind that you get from the kit, I find these are the easiest to work with. Still, if you don’t have that at your house any small knife will work just fine!
Now you are done! The final step to completing your pumpkin is putting a candle in it! Now you have transformed your plain old pumpkin into a Jack-o-lantern.
Your donation will support the student journalists of Sycamore High School. Your contribution will allow us to purchase equipment and cover our annual website hosting costs.